
24 hours of making the most of your Android
[ This space intentionally left blank. ]
Solid State Drives + Striped RAIDs = Maximum MacBook Pro Performance
If you hear the term “RAID” and immediately think of World of Warcraft, then leave now and go back to your guild. Or read this wiki article for a quick education on the various RAID levels and their uses in data storage.
In short, a RAID is a set of physical volumes configured via hardware or software to appear as one volume of data. In some cases, RAID arrays are used to increase the reliability of data storage by configuring multiple disks to mirror the same volume of data, so that if one drive fails, the others will be intact and accessible. When it comes to performance, however, something called a striped RAID is used, and this where things get fun, and a little bit risky.
Currently, my mid-2012 MacBook Pro is configured with a striped RAID using two 512GB SSDs, and the performance gains have been substantial:
BEFORE: Single Solid State Drive

After: Dual Solid State Drives in a Striped RAID
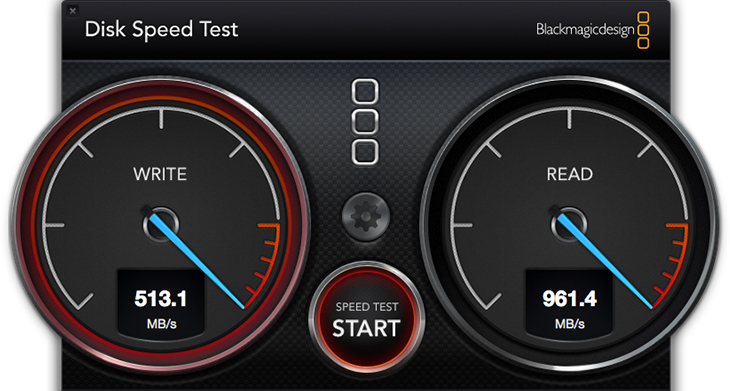
To put these speed tests in more simple terms, going from a single SSD to the striped RAID configuration using two Solid State Drives gave me a 2.2x performance gain on Read speeds and a 4.3x performance gain on Write speeds. This is a massive performance gain that can be felt immediately; it only takes about 15 seconds to boot Yosemite on my mid-2012 MacBook Pro.
However, there is an element of risk to consider here before proceeding.
Using a striped RAID configuration means that you are twice as likely to have a drive failure, simply because you are relying on two disks to store your data and if one drive in a striped array fails, all of your data is lost. I’ve worked with nearly 100 SSDs at this point, and not one has failed or even been dead on arrival; however, knowing my chances of a drive failure are now doubled, I back-up my machine everyday, without fail.
So, if you’re still up for moving to a striped RAID, here’s what you need to do…
- Back-up all of your data to an external drive using Time Machine or Super Duper.
- Make sure you have two SSDs successfully installed. If you haven’t installed your second drive yet, read this.
- Boot up your Yosemite Installer. If you don’t have a Yosemite Installer, read this.
- Run Disk Utility and follow this guide to making a Striped RAID.
- Install Yosemite to your RAID, and move your data back into place.
- Keep your RAID healthy and running blazing fast by enabling TRIM support
If you have any questions, feel free to leave comments here, or hit me on Twitter @joecorbett.

Like what you read? Share it.
(That helps us.)
Love what you read? Patronize Joe Corbett.
That helps us and the writer.
What is Patronizing? Learn more here.